


Table of Contents
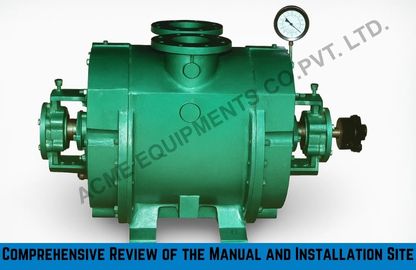
Water ring vacuum pumps are widely used in industrial applications for their ability to handle gases and vapors in various processes. These pumps create a vacuum by utilizing a rotating water ring, making them ideal for applications that require a reliable and efficient vacuum source. Installing a water ring vacuum pump correctly is essential for ensuring long-term performance, energy efficiency, and system reliability.
This step-by-step guide will take you through the entire installation process, from preparation to commissioning, ensuring that your vacuum pump operates at peak efficiency.

Objective of the Article:
The objective of this article is to:
- Provide a comprehensive, easy-to-follow guide for the installation of a water ring vacuum pump, ensuring proper setup and optimal performance.
- Educate engineers, technicians, and maintenance personnel on the necessary steps to safely install the system, connect necessary components, and perform a functional check.
- Ensure the pump is installed correctly for long-lasting performance and compliance with safety standards.
- Highlight best practices to maintain system efficiency and troubleshoot common installation issues.
Step-by-Step Guide for Installing a Water Ring Vacuum Pump
Preparation for Installation
Before beginning the installation process, it’s essential to prepare the equipment and workspace.
Step 1.1: Unbox and Inspect the Pump
- Carefully unbox the water ring vacuum pump and all its components (motor, connections, accessories, etc.).
- Inspect the pump for any visible damage, loose parts, or missing components.
- Ensure you have the necessary tools and equipment for installation, such as wrenches, screwdrivers, gauges, and gaskets.
Step 1.2: Review the Manual
- Read the installation manual provided by the manufacturer for any specific instructions related to the pump model.
- Familiarize yourself with the pump specifications, including its operating parameters, connection sizes, and lubrication requirements.
Step 1.3: Check the Installation Location
- Ensure the installation site is clean and provides adequate space for the pump and all associated components.
- The pump should be installed in a location that allows for easy access for future maintenance and inspections.
- Ensure the environmental conditions (temperature, humidity, etc.) are within the recommended operating range.
Install the Pump Base and Position the Pump
Step 2.1: Install the Pump Base
- Mount the base of the pump on a level and stable surface. Use vibration-damping materials, such as rubber or springs, to reduce noise and vibrations during operation.
- Ensure the base is securely bolted down to prevent any shifting or movement during operation.
Step 2.2: Align the Pump
- Position the pump and align it with the motor and other components. Use alignment tools to ensure that the pump is positioned correctly and that the shafts are in line to avoid mechanical stress on the system.
Connect the Water Supply and Vacuum Lines
Step 3.1: Connect the Water Inlet
- Connect the water supply pipe to the pump’s water inlet. The pump requires a constant supply of water to operate efficiently. Ensure the water pressure is within the required range, as specified by the manufacturer.
- If necessary, install a water filtration system to prevent debris from entering the pump.
Step 3.2: Install the Vacuum Inlet
- Connect the vacuum inlet to the process equipment or vessel from which the vacuum is being drawn.
- Use appropriate piping, valves, and gaskets to ensure an airtight seal and prevent leaks.
Step 3.3: Install the Water Outlet
- Connect the water outlet to a drain or a water collection system. The pump expels water after it has been used in the vacuum process, and this water should be directed to an appropriate location for disposal or recycling.
- Ensure that the water outlet pipe is properly installed and positioned to allow smooth water flow and prevent any buildup or flooding.
Motor and Electrical Connections
Step 4.1: Install the Motor
- Mount the motor onto the pump assembly according to the manufacturer’s instructions. Ensure that the motor is properly aligned with the pump shaft.
- If your system uses a belt-driven motor, install the pulleys and belts according to the specifications.
Step 4.2: Electrical Wiring
- Connect the motor’s electrical wiring to the power source. Ensure that all electrical connections are made in accordance with local electrical codes.
- Verify that the voltage and current match the motor’s requirements. Use a disconnect switch or circuit breaker for safety during operation.
- Ensure proper grounding of the motor and pump to prevent electrical hazards.
Priming the Water Ring Vacuum Pump
Step 5.1: Fill the Pump with Water
- Fill the pump with water through the designated water fill port. Ensure that the water level is sufficient to create the necessary water ring inside the pump.
- Check the manufacturer’s guidelines for the recommended water level.
Step 5.2: Check Water Circulation
- Activate the pump’s water circulation system to ensure that the water flows freely inside the pump, circulating through the rotor and chamber.
- Monitor the water flow and ensure there are no blockages or leaks in the system.
Test the Water Ring Vacuum Pump
Step 6.1: Perform a Dry Run
- With the water ring pump connected, perform a dry run (without drawing any vacuum) to check for mechanical issues such as unusual vibrations, sounds, or leaks in the system.
- Listen for abnormal noises that could indicate misalignment or friction between moving parts.
Step 6.2: Test the Pump Under Load
- Start the pump and observe its performance while drawing a vacuum. Check for stable vacuum pressure and ensure that the system is operating within the desired parameters (e.g., flow rate, vacuum pressure).
- Monitor the water flow through the system and ensure that water is being expelled from the water outlet.
Step 6.3: Check the Control Panel
- Test the control panel or automated system to ensure that the pump can be turned on/off, and that the safety mechanisms (such as pressure relief valves) are functioning properly.
- Verify that all alarms and shutdown procedures are in place and properly calibrated.

Final Checks and Commissioning
Step 7.1: Verify Pump Performance
- Measure the vacuum pressure and flow rate to confirm that the pump is delivering the expected performance.
- Check that the system is operating within the manufacturer’s specifications.
Step 7.2: Perform Final Safety Checks
- Check all safety devices, including pressure relief valves, emergency shutdown switches, and overload protection mechanisms.
- Ensure that the system is fully secured and that there are no risks of leakage or electrical hazards.
Step 7.3: Complete Documentation
- Document the installation process, including any adjustments, safety checks, and test results. Keep these records for future reference during maintenance or troubleshooting.
FAQs: About Water Ring Vacuum Pump
What is a water ring vacuum pump used for?
A water ring vacuum pump is used to create a vacuum by utilizing a rotating water ring inside the pump chamber. It is ideal for handling gases, vapors, and liquids, commonly used in applications such as food processing, chemical industries, and water treatment plants.
How does a water ring vacuum pump work?
A water ring vacuum pump works by creating a rotating water ring inside the pump chamber. As the pump rotor turns, water is carried along the inner wall of the pump, creating a low-pressure zone that draws in gas and vapor, which is then expelled via the exhaust.
What water source is required for a water ring vacuum pump?
A constant supply of clean water is needed to maintain the water ring in the pump. Depending on the application, you may need to filter or treat the water before it enters the system to prevent clogging or wear.
Can I install a water ring vacuum pump outdoors?
Water ring vacuum pumps can be installed outdoors if the system is properly protected from the elements. It is essential to ensure that the system is weatherproofed and that electrical components are safely housed to prevent damage from exposure to rain or extreme temperatures.
How do I maintain a water ring vacuum pump?
Routine maintenance includes checking water levels, inspecting the seals, monitoring performance, and cleaning the pump components to prevent build-up. Regular checks for leaks, unusual noise, and vibration are essential to ensure optimal performance.
How do I troubleshoot if the pump is not creating sufficient vacuum pressure?
If the pump is not reaching the desired vacuum pressure, check for issues such as water level imbalance, clogged pipes, air leaks, or motor malfunctions. It may also be necessary to inspect the water ring for damage or blockage.
Conclusion
Installing a water ring vacuum pump is a straightforward process if done correctly. By following the step-by-step installation guide, you can ensure that the pump operates at peak efficiency, with reliable performance for your vacuum requirements. Proper maintenance, testing, and calibration are critical to ensuring the longevity and effectiveness of the system. Always prioritize safety and perform regular inspections to maximize the pump’s operational life.
About Author

CEO
Mr. Vishwesh Pardeshi is the CEO of Acme Air Equipments Company Pvt. Ltd., an industrial and engineering goods manufacturing company based in Ahmedabad, Gujarat (India). He has taken over the responsibility from founding Partners and Directors of the Company, and is now leading a talented group of professionals since 2020 by bringing in vast industrial and management expertise. By qualification, he holds a Bachelor Degree in Mechanical Engineering and also holds a MBA degree from reputed institutes. Under his leadership, the Company has successfully executed prestigious projects by delivering high quality and world class products from a state of the art manufacturing facility which combines CNC-enabled precision manufacturing and strong after sales support. In line with the Vision, Mission and Core Values of the Organization, Mr. Vishwesh Pardeshi continues to drive Quality, Reliability and Global Expansion at Acme Air Equipments Co. Pvt. Ltd.